The Basics
This is the basics of Waffleweb. You will get walked through all the basic features of Waffleweb and how to use them.
Creating a project
To start creating your website with Waffleweb you first need to create a project. To create a project you can create a python file and put a WaffleProject object in it as so.
project.py:
from waffleweb import WaffleProject

apps = [

]

yourProject = WaffleProject(apps)
Apps hold all of your pages, we will add some soon.
Creating an app
To add pages to your website you need apps. To create an app you can create a python file and put a WaffleApp object in it as so.
app.py:
from waffleweb import WaffleApp

yourApp = WaffleApp('appName')
WaffleApp only needs to take one variable for now: the name of your app. The name of your app is for some functions to identify your app.
To register your app, all you need to do is add ‘app.yourApp’ to your project’s app list. your project.py should now look as so. Remember the last part of the app string should NOT be the appName of your app. It should be the variable of your WaffleApp.
project.py:
from waffleweb import WaffleProject

apps = [
    'app.yourApp'
]

yourProject = WaffleProject(apps)
Running your project
To run your project under the default address “127.0.0.1:8000” you can use the run() method of your WaffleProject object.
project.py:
if __name__ == '__main__':
    yourProject.run()
In your terminal you should now see:
Waffleweb version 0.1.0
Server listening on host 127.0.0.1, port 8000
Press Ctrl+C to stop server
If you want to change the host or port you can specify them in run().
project.py:
yourProject.run(host='0.0.0.0', port=8080)
Right now if you go to “127.0.0.1:8000” you will see a 404 page. This is because we haven’t routed any pages yet. We will add some routes later.
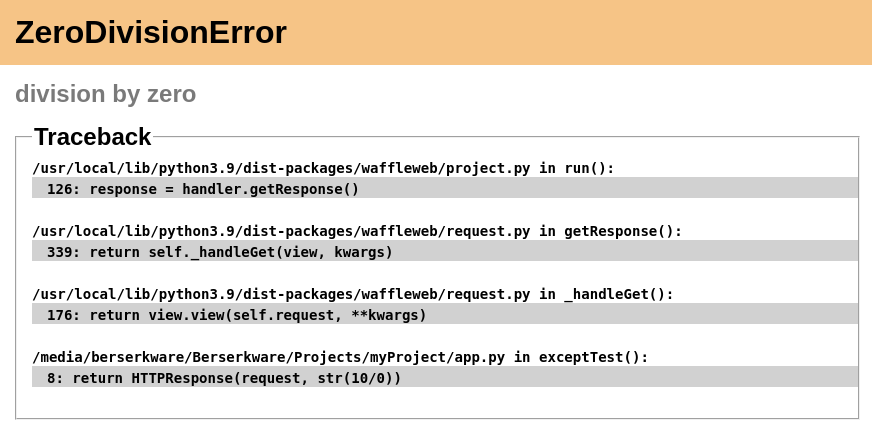
Debug Mode
Debug mode allows you to see extra data about 404, traceback and error data in the browser.
You can turn on debug mode by adding debug=True to run().
project.py:
yourProject.run(debug=True)
Example with exception:
Routing
Every website needs good URLs to make a page more memorable. Routing enables you to bind a function to a URL.
To route a URL use the route() decorator.
app.py:
from waffleweb.response import HTTPResponse

@yourApp.route('/')
def index(request):
    return HTTPResponse(request, 'Welcome to the index page!')

@yourApp.route('/about/')
def about(request):
    return HTTPResponse(request, 'About page')
All of your routed functions have to take a request argument. The request argument stores all the request data such as post data, cookies and headers. You have to pass the request argument to the HTTPResponse.
URL Variables
You can add variables to your URL by adding <variableName:type> to your URL. Your function can access the variables through the keyword args of your view function. The type part tells Waffleweb what type to convert the variable to.
app.py:
@yourApp.route('/article/<articleName:str>/')
def articleView(request, articleName):
    return HTTPResponse(request, f'Article: {articleName}'

@yourApp.route('/post/<postId:int>/<postName:str>')
def post(request, postId, postName):
    return HTTPResponse(request, f'Post Number {postId}')
Type options:
str |
converts the variable to a str |
int |
converts the variable to a int |
float |
converts the variable to a float |
Please note that you cannot have a float variable as the last part of your URL. This is because the decimal part of the float will be identified as a file extension.
Redirect behavior
app.py:
from waffleweb.response import HTTPResponse

@yourApp.route('/index')
def index(request):
    return HTTPResponse(request, 'index page')

@yourApp.route('/about/')
def about(request):
    return HTTPResponse(request, 'about page')
The URL for the index page doesn’t end with a slash meaning that if you access the URL ending with a slash you will get shown a 404 page. The URL for the about page has a trailing slash meaning that if you access that page without a trailing slash you will be redirected to the page with a trailing slash.
HTTP Methods
If you only want to allow certain HTTP methods to access your page you can add a optional parameter called methods to the route() decorator.
from waffleweb.response import HTTPResponse

@yourApp.route('/form/', methods=['GET', 'POST'])
def form(request):
    if request.method == 'POST':
        return doFormStuff(request.POST)
    return HTTPResponse(request, 'form')
By default Waffleweb only allows GET, HEAD and OPTIONS requests. If you have ‘GET’ in your methods Waffleweb automatically handles the HEAD and OPTIONS methods.
Static files
To add static files to your Waffleweb project all you need to do is make a folder called static and put your files in there. You can change the folder Waffleweb looks in for your static files in a settings.py file in your project directory. Just add STATIC_DIR = 'path/to/static/' to settings.py.
To access these static files in your browser just go to localhost:8000/folder/file.ext. Waffleweb hides the static directory path in the URL to remove complexity. For example, if your project directory looks like the example bellow then to access test.css you would need to go to localhost:8000/css/index.css NOT localhost:8000/static/css/index.css.
yourProj/
    project.py
    app.py
    static/
        css/
            index.css
To access a static file from your app you can use open() or openStatic(). The difference between open() and openStatic() is that openStatic() searches in your static directory and it’s mode is defaulted to ‘rb’.
from waffleweb.static import openStatic
from waffleweb.response import FileResponse

@yourApp.route('/getImage/<imageName:str>')
def index(request, imageName):
    with openStatic(f'/images/{imageName}.jpg') as f:
        return FileResponse(request, f)
For more information you can go to Static Files.
Responses
HTTPResponse()
Just a basic HTTP response.
from waffleweb.response import HTTPResponse

@yourApp.route('/index/')
def index(request):
    return HTTPResponse(request, 'Index Page.')
JSONResponse()
A Json response. Sets the Content-Type to application/json.
from waffleweb.response import JSONResponse

@yourApp.route('/getData/<data:str>')
def getData(request, data):
    return JSONResponse(request, {'data': data})
FileResponse()
A file response. Takes a bytes file object. The FileResponse sets the Content-Type to whatever the mime of the file is.
from waffleweb.static import openStatic
from waffleweb.response import FileResponse

@yourApp.route('/image/')
def image(request):
    with openStatic(f'/images/image.jpg') as f:
        return FileResponse(request, f)
render()
Renders a template and returns a HTTPResponse. Default templating engine is Jinja2. Default template directory is templates/. You can change the template directory by adding TEMPLATE_DIR = '/path/to/templates/' to your settings.py file.
from waffleweb.response import render

@yourApp.route('/nameGetter/<name:str>/')
def nameGetter(request, name):
    return render(request, 'nameGetter.html', context={'name': name})
redirect()
Redirects to a page.
from waffleweb.response import redirect

@yourApp.route('/nothing/')
def nothing(request, name):
    return redirect(request, 'https://www.youtube.com/watch?v=dQw4w9WgXcQ', permanent=True)
For more information you can go to Responses.
Custom Error Pages
To add custom error pages for status code you can use the errorhandler() decorator. By default waffleweb shows a generic error page.
@yourApp.errorHandler(404)
def page404(request):
    return HTTPResponse(request, '404 Page', status=404)
You have to set the status code or it will automatically default to 200.
For more information you can go to Custom Error Pages.
Accessing request data
The Request object holds all the data about the request. It stores stuff like POST data, cookies and headers. For more in-depth information you can go to the Request How-To Guide. The Request object is passed into you routed function as the first argument.
To access the method of the request use the method attribute. To access form data you can use the POST attribute.
from waffleweb.response import render

@yourApp.route('/form/', methods=['GET', 'POST'])
def form(request):
    if request.method == 'POST':
        name = request.POST['user']
        email = request.POST['email']
        makeAccount(name, email)

    return render(request, 'form.html')
To access URL parameters for a request you can use the URL_PARAMS attribute.
request.URL_PARAMS.get('param1')
For more information you can go to The Request Object.
File Uploads
You can access file uploads with the FILES attribute. The uploaded files are stored in memory. Each uploaded file is a File object. You can access the data of the file with the data attribute. The data of the files are stored in bytes.
from waffleweb.response import render
from waffleweb.static import openStatic

@yourApp.route('/upload/', methods=['GET', 'POST'])
def form(request):
    if request.method == 'POST':
        file = request.FILES.get('file').data
        f = openStatic('file.jpg', 'wb')
        f.write(file)
        f.close()

    return render(request, 'upload.html')
For more information you can go to Uploaded Files.
Adding Middleware
To add middleware to your project, you can add a argument to your WaffleProject object in your project.py file.
project.py:
from waffleweb import WafflewebProject

middleware = [
    'addCookieMiddleware.addCookie'
]

yourProject = WaffleProject(apps, middleware=middleware)
For more information you can go to Middleware.